If you’re ready to smoke a Kansas City–style brisket on a pellet grill, you’ll want a clear, step-by-step plan. You’ll pick a well-marbled piece, trim it right, apply that sweet-salty rub, and manage low-and-slow heat so it stays juicy. Follow the method below and you’ll be surprised how straightforward it can be.
Choosing and Preparing the Brisket
Start by picking a flexible, reddish-pink brisket with a clean white fat cap and even marbling—ideally 10–16 pounds from grain‑fed, USDA Choice (or Prime if your budget allows); avoid yellow or opaque fat, brown spots, or Select grade.
You’ll check flexibility to confirm proper aging and tenderness, and inspect color for consistent reddish-pink that signals good handling. When selecting brisket, favor even intramuscular marbling and uniform thickness so smoke and heat penetrate evenly.
Choose grain-fed cattle for the Kansas City flavor profile; don’t buy previously frozen pieces. For peak meat quality, use vacuum-packaged cuts when possible and rest them briefly out of the package so they relax before seasoning.
These choices set you up for a reliable, flavorful smoke and confidence on cook day. Remember that brisket comes from the cow’s lower chest, which contributes to its toughness and need for low-and-slow cooking.
Trimming and Applying a Kansas City–Style Rub
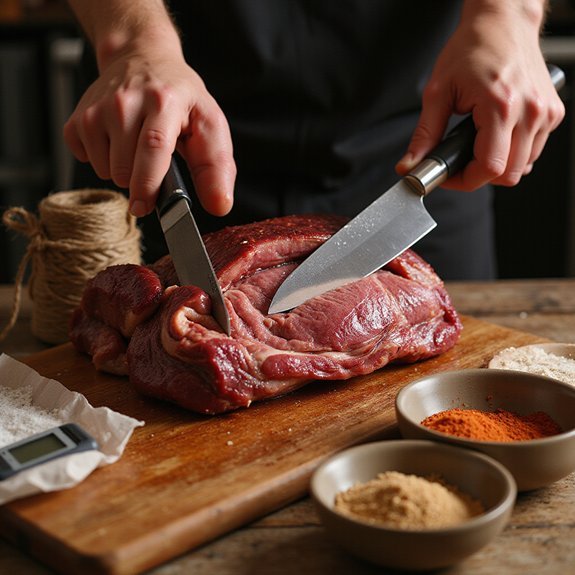
Start with a whole packer brisket so you’ve got both the point and flat for even cooking.
Trim the fat cap to about 1/4 inch and score it so the rub and smoke can penetrate. For best flavor, the rub’s balance of brown sugar and spices complements the beef.
Generously apply a Kansas City–style rub, massage it in, and let the meat rest so the flavors set before smoking.
Select Packer Brisket
When you’re picking a packer brisket, look for a whole 10 to 16 pound cut that includes both the flat and the point, with good marbling and enough fat to keep it moist during a long smoke; Choosing brisket means prioritizing quality and understanding fat’s role so you won’t overcook lean meat.
Keep the brisket refrigerated until use and handle it gently. The recipe’s quantities make a rub suitable for a 15-pound brisket. Pat it dry before applying a Kansas City–style rub—dark brown sugar, smoked paprika, garlic and onion powder, cayenne, black pepper and salt.
Press the rub on evenly so it adheres, use enough to coat without overpowering, and let the seasoned brisket rest briefly so flavors settle. Store any extra rub airtight for next time.
You belong to a community of careful pitmasters.
Trim to 1/4-inch
Trim the fat cap down to a consistent 1/8–1/4 inch so smoke and your Kansas City rub can do their work without the meat getting smothered. This essential preparation helps smoke and rub penetrate and promotes a better bark.
Work cold, use a sharp, flexible boning knife from your trimming tools, and remove any excess beyond that thickness — aim for an even layer, not zero fat. Leave soft, renderable fat for juiciness and bark development; cut away hard, loose fat and silver skin on the lean side to avoid chewiness.
Shape the brisket by trimming jagged edges and the thick seam between flat and point so heat travels evenly and the meat presents well.
Save trimmings for tallow or burgers. You’ll thank yourself later, guaranteed.
Apply Kansas City Rub
Before you fire up the smoker, get the brisket seasoned: pat it dry, score the fat into small squares, then press a generous, even coat of Kansas City–style rub into every surface with your fingertips so it sticks and starts to penetrate.
Notably, Brisket’s role in Steven Raichlen’s culinary experiences underscores the importance of mastering these techniques.
Use a balanced base of dark brown sugar and smoked paprika, add garlic and onion powders, salt, black and cayenne pepper for heat.
Mix thoroughly — use a food processor for a fine, lump-free blend.
Press the rub into the meat, cover all sides, then refrigerate six to eight hours or overnight to let flavor profiles meld.
Explore rub variations—mustard, chili powder, or granulated lemon peel—for community recipes.
Store airtight and expect a sweet, smoky bark on your pellet grill and pride.
Injecting, Resting, and Pre-Smoke Prep
Although some pitmasters skip it for time, you’ll get far better flavor and juiciness by combining a sensible injection, a thorough trim to an even 1/4″ fat cap, and an 8–12 hour rest in the fridge before smoking. A brisket injection can add flavor, salt, and moisture throughout the meat.
Use confident injection techniques: inject the flat about 15 pumps per side following the grain, limit point injections, and avoid over-salting. Immediately rub the surface after injecting so the seasoning bonds.
Inject about 15 pumps per side with the grain, limit point shots, salt lightly, then immediately rub to lock seasoning.
Trim to a uniform 1/4″ fat cap to protect and let rub penetrate. Wrap and refrigerate for 8–12 hours — the resting benefits are real: moisture distributes, flavors deepen, and texture improves.
Clean your injector, use a proper needle, and prep surfaces for the smoke. You’ll join fellow home pitmasters seeing dependable results with this prep.
Pellet Grill Setup: Pellets, Temperature, and Placement
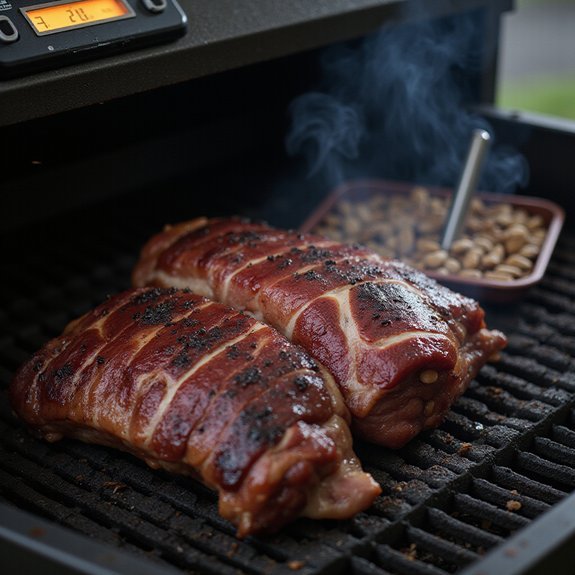
You’ll choose pellets for flavor — oak for balanced Kansas/Texas smoke, hickory for bold, bacon-like notes, mesquite for a punch, or pecan for a milder, nutty profile.
Set the grill low and slow (195–225°F is typical, 225°F common) and plan to raise to about 250°F if you wrap to push to 200–203°F.
Place the brisket away from direct heat (upper rack or outer grate), fat side up to baste, and use a probe in the thickest part to monitor without opening the lid. Also plan for roughly 1–1.5 hours per pound and focus on internal temperature rather than strict time.
Pellet Types and Flavor
Pellet choice is one of the simplest ways to steer a brisket’s final flavor, so match the type of pellet with the cook’s temperature and where the meat sits in the grill.
You’ll rely on oak flavor profiles for a classic, rich backbone and hickory when you want that traditional smoke punch. Pecan nuances bring a sweeter, nutty layer without overpowering. If you crave bold smoke, mesquite intensity delivers punchy results. Cherry enhancements add fruitiness and deeper color.
Don’t be afraid of blending techniques: oak and cherry, hickory and pecan, or mesquite plus oak create balanced complexity. Choose quality pellets, monitor consumption, and experiment within your regional preferences to craft a brisket taste the crew will claim as theirs.
Enjoy the process together daily. Plan on using about 20 lb of pellets per cook.
Temperature Zones and Placement
When you set up your pellet grill, think in zones: keep temps between about 200–275°F for brisket (225°F is a great baseline).
Start lower for the first couple hours to pull more smoke and build bark, then nudge the cooker up to 225–275°F once the flat hits roughly 165°F.
- Position thicker point toward the fire pot.
- Avoid edges; keep meat centered.
- Probe ambient 1–2 inches from brisket.
Use probes: one in the flat, one in the point. Also plan for a target internal temp of 202°F when gauging doneness.
Maintain steady heat — pellet grills do this well, but cold weather may demand more pellets and attention to grill maintenance.
You’ll belong to a community that trusts disciplined temperature management, sharing tips and refining your craft.
Practice probe placement each cook and log results to improve consistency today regularly.
Low-and-Slow Smoking: Timing, Spritzing, and Monitoring
Although low-and-slow can feel like a waiting game, nailing temp, spritzing rhythm, and vigilant probing makes it predictable and repeatable. You’ll aim 225–250°F on a pellet grill, expect 12–16 hours, and monitor internal temps from ~165°F up to 198–201°F. Use spritzing techniques for moisture and flavor enhancement: mist hourly with apple juice/Worcestershire, keep sprays light, and adjust if you hit a stall. Probe the thickest point regularly; trust readings over clock time. Turn the brisket once for even smoke and tweak temps slightly if needed. You belong to a practical smoking community—practice these steps and you’ll get consistent results. They are slow roasted for 12 hours over sweet hickory logs.
| Stage | Action | Goal |
|---|---|---|
| Early | Light spritz hourly | Hydration |
| Mid | Monitor stall closely | Stability |
| Late | Reduce spritz | Bark set |
| Finish | Probe 198–201°F | Tenderness |
Wrapping, Pushing Through the Stall, and Finishing Temps
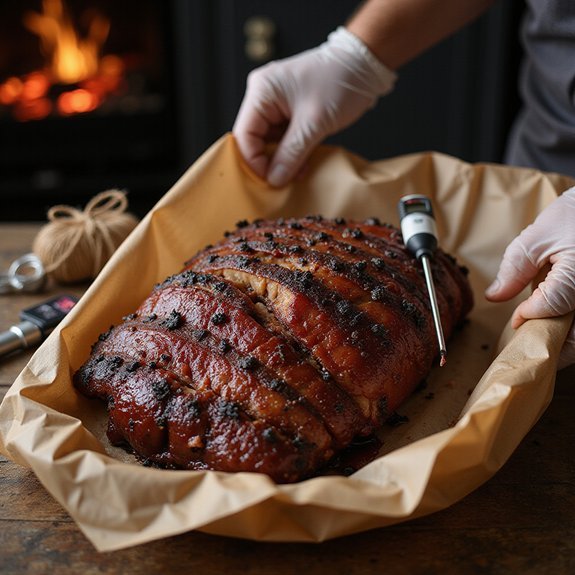
If you want to push through the stall without killing your bark, wrap the brisket once it hits about 165–170°F and a good bark has formed.
Use heavy-duty foil for faster braise or butcher paper to preserve texture; wrap point and flat separately for Kansas City style.
Wrapping techniques lock in moisture retention and speed past the brisket stall so your pellet grill can hold steady temps. These methods also set you up to create classic burnt ends that celebrate Kansas City flavor.
- Choose foil for quicker finish; paper for better bark.
- Stop spritzing after wrap; let the meat braise in its own juices.
- Monitor probe temps; aim to pull around 200–210°F, commonly 205°F.
Rest wrapped 30+ minutes before slicing to guarantee even finishing temperatures and tender, shared results.
You’ll belong to the Kansas City pitmaster circle.
Making Classic Kansas City Burnt Ends From the Point
Now you’ll turn your attention to the brisket point and make classic Kansas City burnt ends that steal the show. Burnt ends are made specifically from the brisket point, which is prized for its marbling and ability to develop rich bark during smoking.
Choose only the point (6–8 lb), trim fat to a 1/4-inch cap, and separate it from the flat so every surface gets smoke and bark.
Rub evenly with kosher salt, coarse black pepper and garlic powder, then rest 30–60 minutes at room temp.
Smoke on a pellet grill at 225–250°F unwrapped about 4–5 hours until ~160°F, using hickory, oak or pecan pellets.
Cube the rested point, toss with a molasses-rich Kansas City sauce and a splash of beef stock, then finish in a foil pan at 250°F for ~90 minutes until caramelized.
These cooking techniques make tender, sticky burnt ends, and crowd-pleasing every time.
Slicing, Saucing, Serving, and Storing Tips
Slicing and serving a brisket well is as important as how you cooked it, so treat the rest of the process with the same care: slice only what you’ll serve, cut against the grain, and adjust thickness—about 1/4-inch for the flat and up to 1/2-inch for the fattier point—to keep each bite tender. Remember to let the brisket rest for at least 30 minutes before slicing so juices redistribute, especially where the flat and point meet.
- Slice: use a sharp knife, cut against the grain, thin for flat, thicker for point; follow slicing techniques for clean cuts.
- Sauce: apply just before serving to keep saucing balance; brush lightly.
- Store: refrigerate at 39°F in airtight containers, using proper storing methods, or freeze portions.
Serve at room temperature or slightly warmed for proper serving temperature; present neatly and enjoy with friends and family and savor together today.