You’re aiming for a brisket that’s tender, not dry, and the secret isn’t a single number so much as how you get there. You’ll watch temperature, feel the meat, and work around the stall to coax collagen into gelatin. Get these elements right and you’ll hit the sweet spot between 195°F and 205°F—here’s how to make that happen.
Target Internal Temperature Range for Brisket

When you’re aiming for perfect brisket, target an internal range of 195°F–205°F (90°C–96°C); 195°F is the commonly cited minimum for connective tissue breakdown, but most pitmasters let the meat approach 200–205°F to get that silky tenderness.
You’ll use the flat for your primary probe placement — thickest part, avoiding fat pockets, bone and gristle — and take multiple readings so cooking variations don’t surprise you.
Temperature guides you, but probe feel confirms doneness: it should slide like warm butter. If it’s firm at 200°F, give it time.
Temperature guides you, but probe feel confirms doneness — probe should glide like warm butter; if firm, wait.
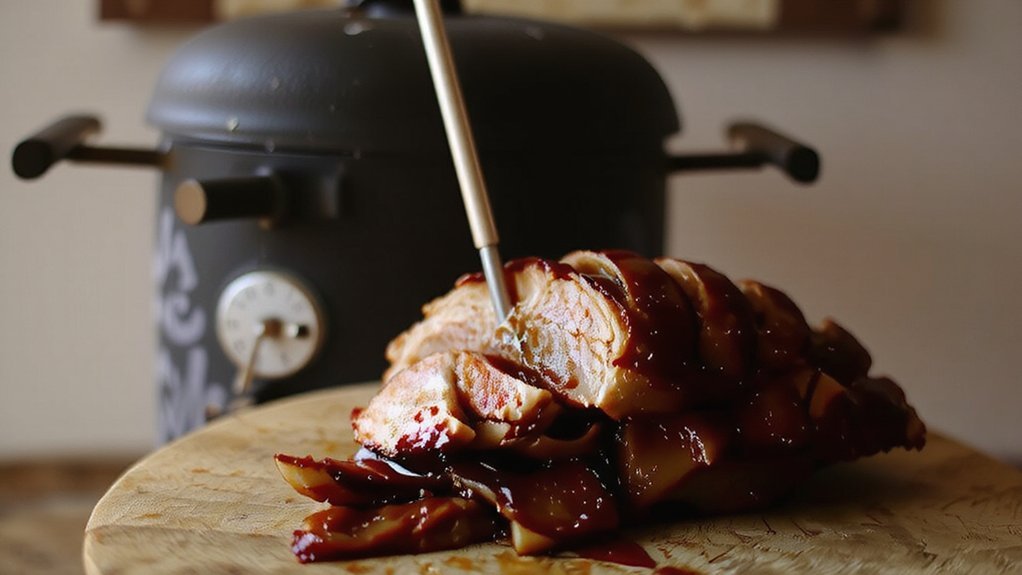
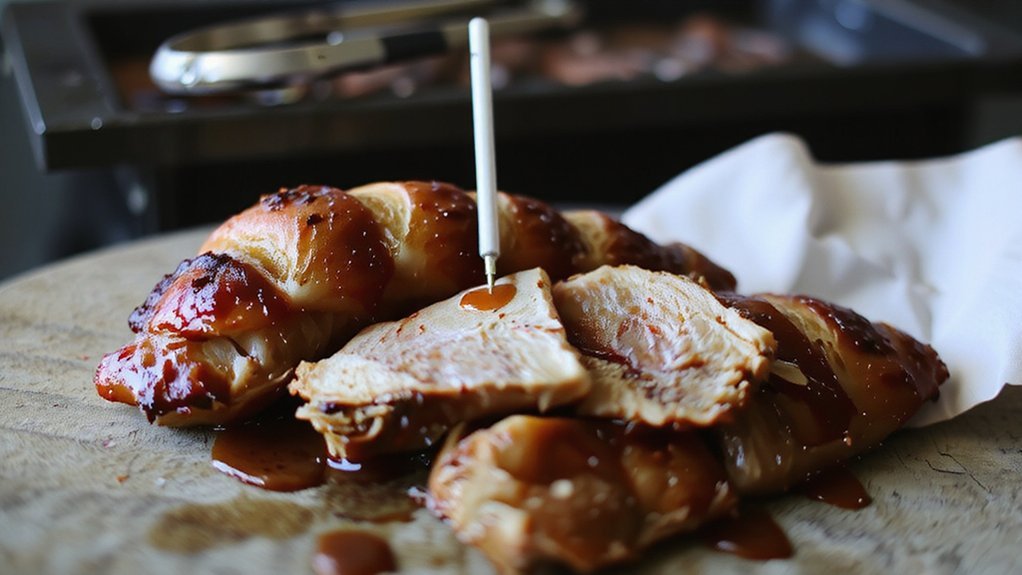
Remove when probe-tender, wrap and rest for carryover to settle around 180–185°F if holding. That’s how you nail the ideal brisket, consistently.
Probe multiple spots in point and flat on larger packers to verify even tenderness throughout.
As a rule, aim for 195°F–205°F.
Understanding the Brisket Stall and How to Manage It
You’ll see the stall when internal temp plateaus around 150–170°F because evaporative cooling from the meat’s moisture offsets heat gain.
Wrapping the point-end in foil (the Texas crutch) cuts evaporation and pushes the cook through the stall faster.
Hold a steady smoker temp, monitor probe temps closely, and only nudge heat up cautiously if the stall drags on.
The stall happens primarily because of evaporative cooling, where moisture evaporation from the meat offsets incoming heat.
What Causes the Stall
Because brisket is loaded with water, evaporation from the surface — not collagen or fat rendering — drives the notorious stall, a temperature plateau that typically occurs between about 150°F and 170°F (68–77°C). This plateau most commonly appears around 160–170°F. You’ll see moisture evaporation pull latent heat from the meat while collagen breakdown continues but doesn’t trigger the pause.
Understand that surface cooling, not fat render, stalls the thermometer.
- Evaporation chills the surface, balancing incoming heat.
- Airflow and smoker humidity change stall timing and depth.
- Energy also fuels connective tissue change, slowing rise but not causing the stall.
Treat the stall as physics; manage airflow and humidity, keep faith in steady heat, and the temp will resume climbing.
You’ll finish with tender brisket once evaporation subsides and internal heat dominates again.
Wrapping to Beat Stall
While the stall shows up because surface evaporation chills the meat, you can beat it by sealing the brisket into a controlled, insulated environment that trades evaporative cooling for conductive heat — pick foil for a fast, braise-like finish, butcher paper to hold a drier, crisper bark, or the boat method to balance both. This approach addresses Moisture retention.
| Method | Effect |
|---|---|
| Foil | Fast finish, high moisture retention |
| Butcher Paper | Preserves bark, allows evaporation |
| Boat Method | Compromises bark and moisture |
Wrap after you’ve built good bark (around 160–170°F). Choose wrapping methods with intent: foil for speed and moisture retention, paper for texture, boat for control. Seal well, keep steady heat, then rest to redistribute juices. You belong at the pit; these are practical tools.
Timing and Temperature Tips
After you wrap (or decide to leave the bark exposed), the next challenge is timing the stall and reading temperature behavior so you can manage the cook without guessing.
For best tenderness, aim for an internal temperature of 195–205°F.
You’ll see a plateau around 150°F–170°F as evaporative cooling slows internal rise; collagen’s still converting to gelatin, so patience pays.
Use reliable probes in the thickest point and maintain 225°F–275°F smoker temps to let the stall resolve naturally. Quick fixes risk tougher meat.
- Monitor probe trend, not single numbers.
- Use a water pan or controlled airflow to steady humidity.
- Expect probing tenderness and rising temps past ~160°F before finishing.
These brisket timing and temperature tips keep you confident, precise, and part of the craft.
Plan for one-to-several hours and resist catering to the clock together.
Doneness Tests: Probe, Bend, Jiggle and Visual Cues
Four practical tests—probe, bend, jiggle and visual cues—give you a reliable read on brisket doneness that temperature alone can’t provide. Use probe insertion in flat and point near 195–205°F; the probe should glide like softened butter, confirming meat tenderness. After resting, do the jiggle test: a Jell-O wobble in the point signals converted collagen. Cut a pencil-width slice for the bend test; it should fold without cracking. Look for visual indicators: dark, adherent bark, clear juices with a faint pink halo, and a glossy surface. Combine these checks with temperature. Aim for an internal temperature of 195–205°F as the primary guide. You’ll belong to a practical crew that trusts repeatable, no-nonsense doneness signals.
| Test | Cue | Action |
|---|---|---|
| Probe | Glide | Confirm temp |
| Bend | Fold | Rest then slice |
They teach you to trust texture, not just the probe.
Cooking Methods and Low‑and‑Slow Temperature Strategies
You should run your smoker low — 225–250°F — when you want classic tenderness and even smoke absorption.
When the brisket hits the stall around 150–165°F, wrap it tight in butcher paper or foil to push through and lock in moisture. This prolonged cooking is necessary for collagen conversion into gelatin, which yields tenderness.
Adjust timing and temps for brisket size and your equipment, because consistent heat and controlled airflow dictate how well fat and collagen render.
Low and Slow Temps
One tried-and-true approach to brisket is low-and-slow smoking at 225–250°F, where you’ll trade time for texture — roughly 30–40 minutes per pound at 250°F versus about 1–1.25 hours per pound at 225°F — and target a 195–205°F internal temperature for tender, gelatinized meat. A common rule is to cook at 250°F for roughly 30–40 minutes per pound. You’ll focus on consistent pit temps, proper thermometer use, and patience. Keep marbling in mind; it rewards you.
Use low temperature cooking and solid smoking techniques to build flavor without rush. Monitor internal temp and pit; avoid fiddling.
- 225–250°F for balance of time and bark
- Aim 195–205°F internal; probe-test for tenderness
- Steady airflow, good wood, reliable thermometer
You’ll still check temperatures and adjust promptly.
You’ll rest the brisket so juices redistribute; that pause belongs to the craft and the pit community.
Wrapping to Beat Stall
When the brisket hits that dreaded stall around 155–170°F, wrap to stop evaporative cooling and push internal temps upward—choose foil if you want maximum moisture and speed, butcher paper if you need a crispier bark with some heat boost, or a boat if you need to control pooled juices while preserving the top crust. Adding a brisket wrap liquid like low-sodium beef broth, apple juice, or beer when you wrap helps retain moisture and deepen flavor. You wrap during the stall after the bark sets; timing and tightness matter. Use foil for top moisture retention, paper for a bark-soul compromise, boat for controlled juices. Practice wrapping methods to match your cooker and crew.
| Method | Feel | Result |
|---|---|---|
| Foil | Comforting, fast | Soft bark, best moisture |
| Paper | Proud, balanced | Crisper bark, decent moisture |
| Boat | Protective, practical | Controlled juice, crisp top |
Do it right and everyone belongs at the pit.
Resting, Holding and Carryover Cooking Best Practices
Because brisket needs time for muscle fibers to relax and juices to redistribute, plan for at least an hour of rest — two hours is preferable — and be prepared to hold properly for several more if service dictates. Note that smoked brisket requires a minimum of 1 hour rest. You’ll remove brisket around 200–205°F, expect brief carryover, then use resting techniques and strict temperature control so internal temp drifts toward 150°F without falling below 140°F.
Use these core practices:
- Wrap tight in foil or pink butcher paper.
- Insulate in a cooler or use a thermostatic holding oven.
- Maintain holding temps of 140°F–170°F until service.
Slice only after rest to retain juices and tenderness. Keep it simple, disciplined, and communal so everyone at the table feels cared for. Respect time; quality beats rushing always.
Troubleshooting Common Brisket Issues and Pro Tips
After you’ve rested and held the brisket correctly, you’ll still run into problems that show up during cooking or at service — tough slices, sloppy bark, dry brisket, or uneven doneness.
You fix most issues by tightening temperature management: stabilize smoker temps between 225 and 250°F, avoid wild swings, and monitor internal temperature toward 180 to 190°F for tenderness.
Trim silver skin, score the fat cap, and buy Choice or Prime so meat quality isn’t the variable. When trimming, leave about 1/4″ fat cap to ensure proper rendering. Control smoke—choose mild woods, don’t over smoke, and use a water pan in offset smokers.
Trim silver skin, score the fat cap, buy Choice/Prime, use mild woods, avoid over-smoking, and employ a water pan
Isolate one variable at a time. Embrace rub experimentation but track recipes. That systematic approach builds consistent brisket and shared confidence.
Share notes with fellow cooks to refine technique and celebrate progress.