You’re about to master Texas-style brisket on a pellet grill, step by step. You’ll pick the right cut, trim fat, apply a simple rub, control low-and-slow temps, handle the stall, and finish for perfect bark and tenderness. Follow the guide and you’ll learn the practical tricks that separate decent brisket from truly great brisket—so keep going.
Essential Equipment and Tools for Smoking Brisket

When you’re smoking a brisket, the right equipment makes the difference between a decent meal and a knockout; you’ll want a reliable smoker (pellet grills are ideal for consistent low-and-slow temps and quick heat-up), a quality grill thermometer plus an instant-read meat probe to monitor both chamber and internal temperatures, sharp trimming and slicing knives with a large cutting board, long tongs and butcher paper for handling and wrapping, heat-resistant gloves, and basic cleaning tools like a grill brush and ash vacuum to keep your smoker performing properly. Consider adding performance enhancers such as temperature probes and searing kits to boost efficiency and accuracy. You’ll also prioritize thermometer calibration before cook, follow simple grill maintenance routines to protect electrical components and preserve performance, and choose knives and tools that help you join a community that cares about consistency and brisket.
Choosing the Right Wood Pellets for Texas Flavor
You’ll pick oak for a rich, consistent smoke and hickory when you want a bolder, bacon-like punch that stands up to beef.
An equal mix of Oak and Cherry pellets is recommended for optimal flavor and bark.
Use mesquite sparingly or blended when you want an intense, southwestern kick that can easily dominate.
Mix pellets during long cooks to control smoke intensity and bark color based on brisket size and regional taste.
Oak and Hickory
Two woods stand out for Texas-style brisket: oak for steady, classic smoke and hickory for bold, savory intensity.
You’ll use wood pairings to dial smoke intensity and honor tradition while keeping control. Oak gives reliable heat, deep bark, steady smoke that penetrates dense brisket; post oak is authentic.
Hickory brings robust, slightly sweet, bacon-like notes—stronger but still balanced, so use it sparingly or mixed. Blend to balance strength and avoid bitterness.
You’ll benefit from consistent burns on a pellet grill for long cooks.
- Oak: steady burn, deep bark
- Hickory: bold, savory aroma
- Mix: balance and control
- Ratio: try 50/50 then adjust
- Practical: buy separate bags and blend
Trust these choices; they’ll help you create authentic Texas brisket that your crew will return for more. For best results, monitor internal temperature and finish the cook when the brisket is probe tender to ensure tenderness.
Mesquite: When to Use
If you’ve been leaning on oak and hickory for steady, reliable smoke, mesquite brings a different dial: a fierce, earthy punch that often defines North Texas barbecue. These pellets are made from 100% mesquite.
You’ll choose mesquite when you want bold mesquite flavor and high smoking intensity that lifts beef’s natural richness. Use pure 100% mesquite pellets if you want authenticity; mix with oak, cherry, or hickory to temper power.
Start sparingly, monitor smoke output, and adjust cook time—mesquite burns hot and steady. Confirm pellets suit your grill and store them dry.
For community-style Texas brisket, mesquite signals tradition; for newcomers, it’s a statement you share. Experiment with blends until the balance feels right for you and your crew.
Start small, watch the smoke, and adjust temps to protect the brisket.
Trimming the Brisket: Fat Cap and Silver Skin
You’ll remove silver skin because it’s tough, prevents seasoning and smoke from penetrating, and ruins tenderness if left intact.
For best results trim while the brisket is cold to make fat easier to cut and to reduce stickiness; Brisket should be cold.
Trim the fat cap to roughly 1/4 inch—leave enough to baste and protect the meat but shave off hard, non-renderable patches.
Use a sharp boning or flexible fillet knife and your thumb as a guide, working slowly on a stable surface to shape smooth, even curves for consistent cooking.
Why Trim Silver Skin
Because it’s a tough collagen membrane that doesn’t render at smoking temperatures, silver skin on the brisket flat acts like a barrier that keeps smoke and rubs from penetrating and can tighten up into a chewy, unpleasant layer as the meat cooks.
Silver skin is composed of elastin, a protein that does not render during cooking.
You should remove it for trimming benefits and flavor enhancement: it lets rubs and smoke reach the muscle, prevents chewy membranes, and improves slice consistency. Trimming takes a sharp knife and patience and gives better mouthfeel.
Consider these points:
- Increases smoke and rub penetration by 10–15% for deeper flavor.
- Eliminates chewy, tightening collagen for consistent tenderness.
- Makes rub application more effective across the flat.
- Preserves underlying meat while removing the membrane.
- Valuable for competition and refined results.
Leave Quarter Inch Fat
After you strip the silver skin, leave about a quarter-inch fat cap on the flat — thick enough to baste and protect the meat as it renders, but thin enough to let smoke and rubs reach the muscle.
You’ll keep moisture, encourage even heat transfer, and avoid insulating the cut so much smoke and seasoning can’t penetrate. Identify the fat cap visually and by feel; remove hard interior deposits but preserve that soft quarter-inch layer.
When you trim, work fat-side up, shave evenly, and watch for pink meat showing. That pink warns you to stop.
The fat cap importance is practical: it bastes and prevents drying without creating greasy bark. Practice trimming techniques to make results repeatable and confident for every brisket you smoke. Look for good marbling because marbling improves juiciness.
Trimming Techniques and Tools
When trimming a brisket, use the right tools and a methodical approach to preserve a quarter-inch fat cap while removing silver skin and hard fat.
You’ll work chilled meat on a sturdy board, using a sharp 6-inch boning or trimming knife to thin thick areas, round edges, and remove tough deposits without wasting meat.
Keep the fat cap about 1/4 inch for moisture and bark balance. Focus on the flat’s top for silver skin removal and the underside for excess fat. Use shears only when needed.
- Start chilled for firmer cuts
- Use a sharp flexible boning knife
- Slide under and peel silver skin
- Thin thick point fat; keep 1/4″ cap
- Square edges for even cooking
Trim with care, share techniques, and trust the process. For pellet grills, preheat to 195 degrees before placing the brisket.
Seasoning Blend and Binding Agents

Although a simple three-ingredient rub—kosher salt, coarse black pepper, and smoked paprika—can define classic Texas brisket, you’ll get a better bark if you apply a light coat of yellow mustard to help the rub adhere. Also, using Kosher Salt is essential for creating the correct bark on the brisket.
Use kosher salt, coarse black pepper, smoked paprika, garlic and a touch of chili or cayenne for heat; think flavor balancing and clear seasoning ratios—start with roughly 1:1 salt to pepper, 1/2 smoked paprika, then adjust.
Kosher salt and coarse pepper equal parts, smoked paprika half, garlic and a kiss of cayenne
Rub lightly and let the mustard bond the spices to the meat for a few hours so the bark develops evenly. Skip sugar if you want tradition.
Store extra blend in an airtight glass jar in a cool, dry place and label it so your crew can replicate the profile with steady confidence.
Prepping and Resting the Brisket Before Cook
Trim excess fat and remove any silver skin, leaving about a 1/4″ fat cap so the brisket cooks evenly and stays moist.
Apply a thin binder like mustard or oil, then press your rub on firmly so it sticks and forms a good bark.
Chill the brisket in the fridge overnight, uncovered or loosely wrapped, so the seasoning sets and flavors concentrate.
For best bark, dry brine brisket overnight by refrigerating it uncovered after seasoning.
Trim Fat and Silver
Chill the brisket so you can handle it precisely: keep it cold, save the purge until you’re ready to discard it, and use a flexible filet knife to shave fat in thin layers, leaving about 1/4 inch on the flat while removing hard, dense fat and any silver skin so smoke and seasoning can penetrate.
Work confidently using trimming techniques; remove grey edges, shape the edges, and respect muscle seams. Keep in mind the brisket is composed of two muscles—the flat and point—so plan trimming to accommodate both.
Take your time—thin shavings preserve fat for fat rendering while avoiding bald spots. Trim with care, maintain a welcoming mindset, and prepare for even cooking.
- Shave fat gradually in thin layers.
- Remove silver skin cleanly.
- Trim point and square edges.
- Preserve 1/4″ on the flat.
- Rest briefly before seasoning.
Apply Binder and Rub
With your brisket neatly trimmed and rested, you’re ready to lock in flavor and build a proper bark by applying a binder and rub. This rub centers on essential ingredients like garlic powder and coarse black pepper, which amplify the beef’s natural flavor.
Choose from binder options like olive or vegetable oil for adhesion and moisture, yellow mustard for tang, Worcestershire for depth, or even pickle juice for acidity that helps break down the surface.
For rub types, go Texas-style: table-grind black pepper, garlic and onion powder, chili powder and Lawry’s salt; add dry mustard, white pepper, red pepper flakes or MSG if you want.
Whisk your rub dry, sprinkle evenly, then gently pat to set. Catch excess on a tray to reuse.
Let the seasoned brisket rest 15–20 minutes while you preheat the pellet grill. Inspect coverage and add more if needed.
Rest Overnight in Fridge
Anything you season benefits from an overnight cold rest: place the brisket on a wire rack over a rimmed baking sheet in the fridge (32–36°F) so the rub can set, moisture can evaporate to form a tacky pellicle, and the surface can firm for better smoke adhesion.
You’ll refrigerate 8–12 hours to let salt draw moisture, bind seasoning, firm fat, and create a surface that grabs smoke — that’s true flavor enhancement.
Keep it uncovered, avoid cross-contamination, and plan to temper it 30–60 minutes before the smoker. You’re part of the same tradition when you follow these steps.
- Maximum airflow on a wire rack
- Uncovered to form a pellicle
- Fridge at 32–36°F for safety
- 8–12 hours is ideal
- Bring to near room temp before smoking
For easier fat removal, trim when cold before the overnight rest.
Setting Up Your Pellet Grill for Low-and-Slow
When you preheat your pellet grill to around 200°F, you set the stage for a moist, evenly smoked brisket.
For pellet grill setup, choose seasoned hardwood pellets—oak or oak-hickory blends balance smoke and heat—and fill the hopper so it won’t starve midcook.
Position the brisket with fat facing the heat source, use a second shelf or move meat away from direct heat if needed.
Place brisket fat-side toward heat; use a second shelf or shift off direct heat as needed.
Clean grates, insert a high-quality probe into the thickest part of the flat, and rely on temperature monitoring rather than the clock.
Maintain 190–225°F; lower temps give more smoke, higher temps shorten finish. Keep pellets dry, monitor hopper level, and expect long, steady runs—your grill should hold temp so you can belong to the confident low‑and‑slow cooks and produce results.
If you’re using a 15–18 lb brisket, place the full packer on the 2nd shelf to avoid direct heat and ensure even smoking.
Smoking Timeline: Initial Smoke and the Stall
Expect the initial smoke to take about 6–8 hours at 200–225°F to bring a 12–14 pound brisket to roughly 165°F, and be prepared for a prolonged stall as the meat hovers between about 145–165°F.
You’ll set your pellet grill to 225°F for classic brisket cooking, place the fat cap up, and choose pellets like oak, hickory, or fruit woods for balanced smoke flavors.
Stay patient; the stall results from evaporative cooling and can hold temperatures for hours. Rely on a quality digital probe and feel to track progress.
Trust the process — you belong here with other cooks who value low-and-slow technique.
- Low-and-slow preserves moisture
- Fat cap protects the meat
- Oak or hickory add depth
- Probe often, not obsessively
- Patience beats a clock and practice
Before you begin, fill the hopper with wood pellets to ensure continuous smoke throughout the cook.
Wrapping Techniques: Butcher Paper Vs Foil
Choice of wrap determines whether your brisket keeps its bark and smoke or trades them for speed and moistness. Most pitmasters wrap around 165°F to help get through the stall.
When you choose butcher paper for brisket wrapping, you let smoke continue to penetrate through semi‑permeable fibers, promoting flavor development while maintaining bark preservation; the surface stays drier and crunchier.
If you pick the foil method, you trap heat and moisture to accelerate cooking speed and push through the stall, producing juicier meat but softer bark and reduced post‑wrap smoke.
Use butcher paper when bark and complex smoke matter and time’s flexible; use foil when schedule, catering, or competition demand predictability and faster finish.
Both are valid tools — you’ll pick the one that matches your priorities and the crowd you’re feeding with confidence today.
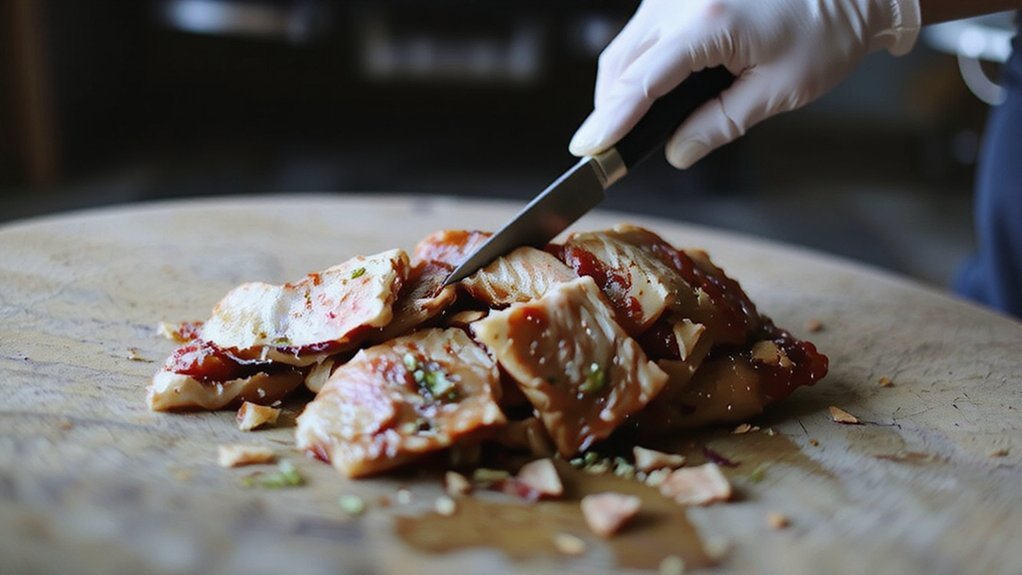
Finishing, Resting, and Slicing for Best Texture
Finish the cook by raising your smoker to 250–275°F and watching for probe‑tender meat — about 200–203°F internal — using a reliable probe so you don’t overcook; wrapping in butcher paper or foil can speed the finish and preserve moisture, but foil will soften the bark more than paper.
Remove at probe‑tender, wrap tight, and rest about 2 hours in an insulated cooler so juices redistribute and juiciness preservation holds. Let internal temp drop toward 150°F, separate point and flat, then slice against the grain about ¼‑inch thick.
Rely on finishing techniques and slicing methods that create uniform, tender servings:
- Use a leave‑in probe
- Rest wrapped 2 hours
- Separate point and flat
- Slice against the grain
- Keep slices consistent
For optimal juiciness, rest the brisket at least one hour and preferably two hours in the cooler so flavors settle resting period.
Beginner Tips, Troubleshooting, and Practice Notes
Once you’ve mastered resting and slicing, you’ll want to focus on the fundamentals that make consistent brisket possible. Set your pellet grill between 200°F–250°F—225°F is ideal for temperature consistency and smoke absorption. Choose hardwood pellets (hickory, oak, pecan) and preheat before loading meat. Place fat side up unless your heat source sits below the grate. Use mustard or Worcestershire as a binder, season generously, and let the rub stick for at least 30 minutes or overnight. Monitor internal temp with a probe; aim for 195°F–203°F before resting. If temps fluctuate, check the hopper and add pellets. If bark or smoke is weak, adjust pellet type and quantity. Practice patience: low and slow, trim, and learn from each cook to join community of pitmasters. Also choose a well-marbled brisket to ensure juiciness and flavor.